So, you want to build a Vert Ramp and you’re wondering where to start. Well, you’ve come to the right site. Just read on and find out how to go about it.
Step 1
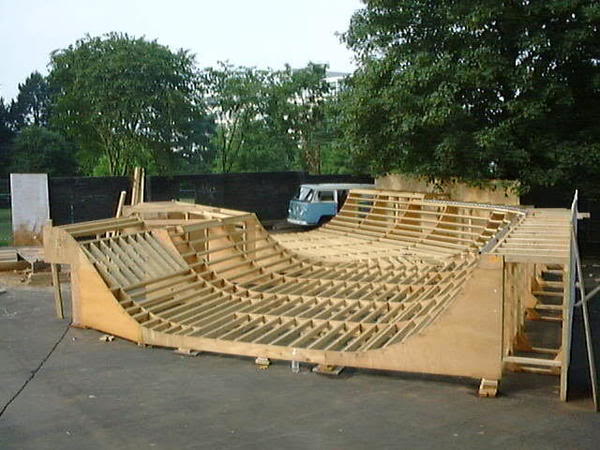
You should first decide on the height and width of the Ramp you want to build. Have at least 4’ wide for the decks. You would want to make a whole size template of the quarter-pipe, which you’ll use in marking all of the end supports the equal size. In that case, 1/4″ plywood would work perfectly well for this. Cut scabs plates from 3/4″ ply at point where the seams join together and then hold the pieces together using 3/4″ wood screws. Rip one sheet to 23 and 3/4″ in order to get two rips out of one sheet. Cut 2 feet from one of the rips and then scab it to a full length piece so that you get a rectangle of 0.6m by 3.0m. Scab together a 5 foot square and then hook it to your rectangle. In that way, it will look like a giant boot. Into the top corner of 5 by 5 square, drive a nail. Remember the square is not connected to your rectangle. Use that nail as a pivot to mark the radius starting from the top corner up to the bottom corner and it should be directly below the nail. Use jigsaw to cut this radius out.
Step 2
You now need to make two end panels in every quarter-pipe using the template. To do that, simply use two layers of ¾ inch or 1.9 cm plywood that you’ll laminate together. To laminate the layers, you need to get wood glue and pour it into a paint tray. Using a roller, roll a thin layer of the glue over the whole surface of the bottom layer. Take the top layer and lay it down over the glue and make sure it turns the grain 90 degrees. Line up the edges and screw the two layers together. Leave it overnight and then use the template in marking out the end panels. Use a jigsaw to cut them out.
Step 3
Make the intermediate supports using your template. Use 2 by material to scab together the single layer 3/4″ ply. Ensure scab plates are approximately 2 inches in from edges.
Step 4
Cut many 2x4s into 3 feet and ensure they’re all cut to the same length. You can do that by use of a stop block set up.

Step 5
Flat edge of the 2x4s should now be lined up with the edge of your end panels and then nail them at the end panels just a few inches from each other. Use the same spacing to nail the other end to your intermediate panel. To nail the 2x4s easily, simply stagger them between intermediate panels. Use several intermediate panels until you get your desired overall length.
Step 6
You need to frame under the platform for supporting the weight of the user and during the landing. Anchor your framing to the ground to prevent it from tipping over.
Step 7
The last step is to install the riding surface. The best material to use here is 3/8 inch CDX plywood. In the same direction, run two layers and to break the seams, just run a full course across the full length. Now, you need to run a 2-foot rip along with the grain running similarly on the top. Finally, screw or nail it to the 2x4s. For more information about Ramp or Skateboard in general, always log in to our website or contact us at anytime.